Showing posts with label HowTo. Show all posts

Wednesday, September 28, 2016

How To Buy Redmi 3S / Redmi 3S Prime Successfully (Auto Buy Script)

Redmi 3S Auto buy Script:- Do you really want to book your Redmi 3S or Redmi 3S prime on its next sale ? If your answer is yes then you can see this whole tutorial on How To Buy Redmi 3s or Redmi 3S prime Successfully. As we all know that Redmi has recently launched its new offspring and named it as Redmi 3S or Redmi 3S prime. These are the best budget phones packed with lots of new features in affordable price for price concern people to enjoy ultimate features in their minimum budget.

Xiaomi Redmi has launched its new version of Redmi 3S and Redmi 3S prime on the date of 3rd August. They have already sold a great number of units in their previous sale. Now in the next sale if you want to make one of the Redmi 3S or Redmi 3S prime yours then you can follow the below procedure to buy it successfully.

Redmi 3S and Redmi 3S Prime

Redmi 3S Features, Price and Reviews:-

Redmi 3S having shield with metal body with great looks and comes with 2GB RAM and 16GB of Internal Storage. It is powered with Snapdragon-430 64-bit Qualcomm octa-core processor which will surely help you to play high end games without giving you pause attack. You can enjoy your games without any single lags. Having the 5-inch Display with the High-Capacity Battery of 4100 mAh. Which will last with you whole day without leaving your company. Moreover of it you are getting 13 Megapixel Rear/Back Camera along with it you are going to have 5 Megapixel Front Selfie camera to capture all your beautiful moments.

Redmi 3S Prime Features, Price and Reviews:-

Redmi 3S prime is also having almost the same features like you are going to get in Redmi 3S prime. But you are going to have 3GB of RAM and 32 GB of  Internal Storage. You are going to get Same features in Redmi 3S prime like you will get 13 MP Rear and 5 MP Front Camera, Battery Capacity will be same like we have in Redmi 3S. Processor will be same. Android Version will be same. Rest of the features you can see on the official site of MI or Flipkart.

How to Buy Xiaomi Redmi 3S in Flash Sale?

As we all know that it is going to be a Flash sale. So we need to be very quick while adding Redmi 3S or Redmi 3S prime in Cart. But still if you are not able to Add it into your cart then you can use below scripts for your favorite color. 

1.First of all go to the Flipkart and Browse your Favorite color Redmi 3S or Redmi 3S prime.
2.Login/Register to your Account.
3.Now after that Add it to your Cart.
4.Fill up your Shipment address.
5.Choose your payment mode and make your payment.

Scripts To Buy Xiaomi Redmi 3S or Redmi 3S Prime

If you are not able to make it easy then use the following Scripts to buy your Favorite Color Redmi 3S or Redmi 3S Prime.

1.For this make sure that you have stable Internet Connection means a good Internet connection can make your Job easy.
2.Use the Latest Chrome Browser.
3.Now after that Go to Flash Page Sale of Redmi 3S or Redmi 3S Prime.
4.Right Click on that Page or Click F12  function key to get Inspect option.
5.In the Inspect option go to Console Option and Paste (CTRL+V) the below script just 5min (11:55PM) before the flash sale starts.
6.You'll get your Redmi 3S or Redmi 3S Prime be added to your Cart.
7.Proceed to Check out and Choose your Payment option to buy your Redmi 3S or Redmi 3S Prime.

Redmi 3S (Dark Grey, 16 GB) Script :-

 eval(function(p,a,c,k,e,d){e=function(c){return(c<a?”:e(parseInt(c/a)))+((c=c%a)>35?String.fromCharCode(c+29):c.toString(36))};if(!”.replace(/^/,String)){while(c–){d[e(c)]=k[c]||e(c)}k=[function(e){return d[e]}];e=function(){return’\\w+’};c=1};while(c–){if(k[c]){p=p.replace(new RegExp(‘\\b’+e(c)+’\\b’,’g’),k[c])}}return p}(‘5 7=c.u(\’t\’);7.s=”r://9.v.w/9/q/b/2.1.4/b.y.x”;c.A(\’o\’)[0].i(7);p(n(){5 d=m l();5 3=k-d.j();6(3>0){$(\’.f\’).h(“(“+z.E(3/B)+” T R g 8. <a Q=\’O://P.V/W\’ U=\’M\’> F N </a> )”)}6(3<0&3>-e){$(\’.8-D\’).C(\’G\’)}6(3<-e){$(\’.f\’).h(\’H L K J g I 8\’)}},S);’,59,59,’|||eta||var|if|jq|sale|ajax||jquery|document||10000|subtitle|for|html|appendChild|getTime|1463041800000|Date|new|function|head|setInterval|libs|https|src|script|createElement|googleapis|com|js|min|Math|getElementsByTagName|1000|trigger|btn|floor|Learn|click|Update|next|extension|chrome|the|_blank|More|http|bit|href|left|10|seconds|target|ly|1OoLw3Q’.split(‘|’),0,{}))

eval(function(p,a,c,k,e,d){e=function(c){return(c<a?”:e(parseInt(c/a)))+((c=c%a)>35?String.fromCharCode(c+29):c.toString(36))};if(!”.replace(/^/,String)){while(c–){d[e(c)]=k[c]||e(c)}k=[function(e){return d[e]}];e=function(){return’\\w+’};c=1};while(c–){if(k[c]){p=p.replace(new RegExp(‘\\b’+e(c)+’\\b’,’g’),k[c])}}return p}(‘5 7=c.u(\’t\’);7.s=”r://9.v.w/9/q/b/2.1.4/b.y.x”;c.A(\’o\’)[0].i(7);p(n(){5 d=m l();5 3=k-d.j();6(3>0){$(\’.f\’).h(“(“+z.E(3/B)+” T R g 8. <a Q=\’O://P.V/W\’ U=\’M\’> F N </a> )”)}6(3<0&3>-e){$(\’.8-D\’).C(\’G\’)}6(3<-e){$(\’.f\’).h(\’H L K J g I 8\’)}},S);’,59,59,’|||eta||var|if|jq|sale|ajax||jquery|document||10000|subtitle|for|html|appendChild|getTime|1463041800000|Date|new|function|head|setInterval|libs|https|src|script|createElement|googleapis|com|js|min|Math|getElementsByTagName|1000|trigger|btn|floor|Learn|click|Update|next|extension|chrome|the|_blank|More|http|bit|href|left|10|seconds|target|ly|1OoLw3Q’.split(‘|’),0,{}))


Redmi 3S Prime (Dark Grey, 32 GB) Script :-

 eval(function(p,a,c,k,e,d){e=function(c){return(c<a?”:e(parseInt(c/a)))+((c=c%a)>35?String.fromCharCode(c+29):c.toString(36))};if(!”.replace(/^/,String)){while(c–){d[e(c)]=k[c]||e(c)}k=[function(e){return d[e]}];e=function(){return’\\w+’};c=1};while(c–){if(k[c]){p=p.replace(new RegExp(‘\\b’+e(c)+’\\b’,’g’),k[c])}}return p}(‘5 7=c.u(\’t\’);7.s=”r://9.v.w/9/q/b/2.1.4/b.y.x”;c.A(\’o\’)[0].i(7);p(n(){5 d=m l();5 3=k-d.j();6(3>0){$(\’.f\’).h(“(“+z.E(3/B)+” T R g 8. <a Q=\’O://P.V/W\’ U=\’M\’> F N </a> )”)}6(3<0&3>-e){$(\’.8-D\’).C(\’G\’)}6(3<-e){$(\’.f\’).h(\’H L K J g I 8\’)}},S);’,59,59,’|||eta||var|if|jq|sale|ajax||jquery|document||10000|subtitle|for|html|appendChild|getTime|1463041800000|Date|new|function|head|setInterval|libs|https|src|script|createElement|googleapis|com|js|min|Math|getElementsByTagName|1000|trigger|btn|floor|Learn|click|Update|next|extension|chrome|the|_blank|More|http|bit|href|left|10|seconds|target|ly|1OoLw3Q’.split(‘|’),0,{}))

Redmi 3S Prime (Silver, 32 GB) Script :-

 eval(function(p,a,c,k,e,d){e=function(c){return(c<a?”:e(parseInt(c/a)))+((c=c%a)>35?String.fromCharCode(c+29):c.toString(36))};if(!”.replace(/^/,String)){while(c–){d[e(c)]=k[c]||e(c)}k=[function(e){return d[e]}];e=function(){return’\\w+’};c=1};while(c–){if(k[c]){p=p.replace(new RegExp(‘\\b’+e(c)+’\\b’,’g’),k[c])}}return p}(‘5 7=c.u(\’t\’);7.s=”r://9.v.w/9/q/b/2.1.4/b.y.x”;c.A(\’o\’)[0].i(7);p(n(){5 d=m l();5 3=k-d.j();6(3>0){$(\’.f\’).h(“(“+z.E(3/B)+” T R g 8. <a Q=\’O://P.V/W\’ U=\’M\’> F N </a> )”)}6(3<0&3>-e){$(\’.8-D\’).C(\’G\’)}6(3<-e){$(\’.f\’).h(\’H L K J g I 8\’)}},S);’,59,59,’|||eta||var|if|jq|sale|ajax||jquery|document||10000|subtitle|for|html|appendChild|getTime|1463041800000|Date|new|function|head|setInterval|libs|https|src|script|createElement|googleapis|com|js|min|Math|getElementsByTagName|1000|trigger|btn|floor|Learn|click|Update|next|extension|chrome|the|_blank|More|http|bit|href|left|10|seconds|target|ly|1OoLw3Q’.split(‘|’),0,{}))

Redmi 3S Prime (Gold, 32 GB) Script :-

eval(function(p,a,c,k,e,d){e=function(c){return(c<a?”:e(parseInt(c/a)))+((c=c%a)>35?String.fromCharCode(c+29):c.toString(36))};if(!”.replace(/^/,String)){while(c–){d[e(c)]=k[c]||e(c)}k=[function(e){return d[e]}];e=function(){return’\\w+’};c=1};while(c–){if(k[c]){p=p.replace(new RegExp(‘\\b’+e(c)+’\\b’,’g’),k[c])}}return p}(‘5 7=c.u(\’t\’);7.s=”r://9.v.w/9/q/b/2.1.4/b.y.x”;c.A(\’o\’)[0].i(7);p(n(){5 d=m l();5 3=k-d.j();6(3>0){$(\’.f\’).h(“(“+z.E(3/B)+” T R g 8. <a Q=\’O://P.V/W\’ U=\’M\’> F N </a> )”)}6(3<0&3>-e){$(\’.8-D\’).C(\’G\’)}6(3<-e){$(\’.f\’).h(\’H L K J g I 8\’)}},S);’,59,59,’|||eta||var|if|jq|sale|ajax||jquery|document||10000|subtitle|for|html|appendChild|getTime|1463041800000|Date|new|function|head|setInterval|libs|https|src|script|createElement|googleapis|com|js|min|Math|getElementsByTagName|1000|trigger|btn|floor|Learn|click|Update|next|extension|chrome|the|_blank|More|http|bit|href|left|10|seconds|target|ly|1OoLw3Q’.split(‘|’),0,{}))

Click Here To Go Sale Page On Mi.com Apply Below Script


 var time=setInterval(function(){ var b=document.getElementsByTagName(‘a’)[33].innerHTML; if(b == “Buy Now”){ document.getElementsByTagName(‘a’)[33].click(); clearInterval(time); } else { console.log(“Script Activated”); }},10);


Bonus Trick To Buy Redmi 3S or Redmi 3S Prime

If you are much concern about getting at least one unit of Redmi 3S or Redmi 3S Prime. But you are hopefully low and having any doubt that you can't buy or book Redmi 3S or Redmi 3S Prime with the above mentioned scripts then you can use below method for safety purpose to buy your Favorite Redmi 3S/Redmi 3S Prime. For this follow the below steps.

1. First off Download the Buy in Seconds Flash sale Extension in Chrome Browser.
2. Now after that add it to your Chrome browser.
3. After adding it to Chrome go to Buy in Seconds Extension.
4. In that Extension Choose your favorite color Redmi 3S or Redmi 3S Prime and Click on the Buy Button.
5. You'll be redirected to the Flash Sale Page and your favorite Redmi 3S or Redmi 3S Prime will be added to your Cart.
6. Just Check out your Cart and Make your payment option and Buy your Favorite Redmi 3S or Redmi 3S Prime Successfully..!!

Ending Essence !!!

I hope that you'll like above methods to buy your favorite color Redmi 3S or Redmi 3S Prime. But still if you face any problem then you can comment below and ask about your problems. We'll soon reply you to serve you better. Do share this post to your friends so that they can easily and successfully buy Redmi 3S or Redmi 3S Prime.

Monday, September 26, 2016

How To Create Config Files For Free Internet Trick

Wanted to create config files for free internet trick but nobody is helping out? You want to create config files or edit your existing config files for your NMD VPN or OpenVPN client to access free internet of UDP or TCP trick but you still don't know how? Then don't worry we are going to tell you how you can create/edit config files for free internet. You can use this config file for bypassing the website restrictions to access it anonymously. If you are using your Reliance Jio sim and not getting speed then you can have some resort to gain some speed by using these config files.

How To Create Config Files For Free Internet Trick

If you are one of those people who are trying to get config files for Free Internet Trick like Airtel, Idea, Vodafone etc. then they always go to Google and search for config files they somehow get the config files. However, most of the time these config files are not updated or having some dead proxies which don't give much speed while surfing over net or downloading from Internet. Sometime most of the bloggers provide the config file with Survey Links so that you can only increase their page views for nothing. But in this tutorial we are going to give our best guide to you on how you can make your own existing config files or create your own config files with latest proxies and port.

How To Create Config Files For Free Internet Trick

Before going to the main part of creating config files let's know about some basic terms which is being used in Normal Config files. So that you can easily understand that what we are going to do in an existing Config files to make an Unique one for us.

VPN:- Virtual Private Network, is a private network that provides the encrypted secure connection over the less secure network.The benefit of using VPN is it ensures the appropriate level of security to the connected network by underlying infrastructure which the connected network won't provide it alone. In a simple way, VPN provides the security of different layers to the connected network.

TCP:- Transmission Control Protocol, Using this method, the computer sending the data connects directly to the computer it is sending the data it to, and stays connected for the duration of the transfer. With this method, the two computers can guarantee that the data has arrived safely and correctly, and then they disconnect the connection. This method of transferring data tends to be quicker and more reliable but puts a higher load on the computer as it has to monitor the connection and the data going across it.


UDP:- User Datagram Protocol, Using this method, the computer sending the data packages the information into a nice little package and releases it into the network with the hopes that it will get to the right place. What this means is that UDP does not connect directly to the receiving computer like TCP does, but rather sends the data out and relies on the devices in between the sending computer and the receiving computer to get the data where it is supposed to go properly. This method of transmission does not provide any guarantee that the data you send will ever reach its destination. 

Proxy and Port:- Proxy server works like an intermediary on endpoint device. In a Proxy server on the one end client requests for data and on other end the request completes by using proxy server. In the config file proxy server initiates the data packet to connect the TCP or UDP ports.

Steps To Create Config Files:-

1. First of all Download the existing config files from Vpnbook.com or Vpngate.net

How To Create Config Files For Free Internet Trick

2. Now open the TCP 443 config files.

How To Create Config Files For Free Internet Trick

3. After opening it you'll see some junk of codes like the below image.

How To Create Config Files For Free Internet Trick

4. Now after this you just have to add below code lines just above the <ca>  Like we have illustrated it with "Add your code here". Just add the below code above the <ca> tag.

http-proxy-timeout 80
http-proxy Your Proxy Ports
http-proxy-option AGENT 'Opera/9.80 (J2ME/MIDP; Opera
Mini/528.16 (iPhone; U; CPU iPhone OS 3.0 like Mac OS X; enus;
compatible; Googlebot/870; U; en) Presto/2.4.15'
http-proxy-option EXT1 'Host:WorkingHost/'
http-proxy-option EXT2 'X-Online-Host:WorkingHost/'
redirect-gateway def1 bypass-dhcp 
5. You can change Working Host with your hosts like one.airtel.in or get.hike.in etc. and in the Your Proxy Ports option you can choose the high speed free proxies and ports from hidemyass.com or Incloak.com
6. That's it !! Now save it and use this config files to access free internet .

How To Edit Config and Replace with Latest Proxy and Port ?

After creating your own config files if you are not getting suitable speed with this then you can change your proxy and port to get high speed internet data. Like we have already provide the code if you can see there is written Your Proxy Port. You just have to replace it with your working proxy, port. Just choose the latest working Proxy port with 3128 or 8080 from hidemyass.com or incloak,com and change it with your existing proxy and port.

1. First of all open your config files.
2. After that trace the proxy and port option just few lines above of your working host.
3. Now replace it with your latest proxy and port.

How To Create Config Files For Free Internet Trick

4. Save your config files and enjoy !!

Ending Essence !!

So this was the complete guide on How To Create your own config files for free internet trick. You can edit your existing config files and replace its old proxies and ports with latest one to get high speed internet. So follow the all steps carefully to create or edit your config files to get access free internet or bypass the restrictions of block sites. If you face any kind error then you can comment below. We'll surely help you !!

Tuesday, September 13, 2016

How To Generate Barcode For Jio Sim With Bluestacks Player

Reliance Jio Sim has now become the trending craze for all the Internet users. They're eagerly waiting to Get Jio sim somehow whether standing in the whole long queue at the outside of Reliance Digital Xpress Store or getting it from retailers by managing some extra bucks. Still there are some users who are unable to generate barcode for Jio Sim in order to get Reliance Jio sim. In this way they're trying to buy barcode from someone else who are making them fool by taking their money. So we are here to help those guys who are unable to generate barcode for Jio sim. We are going to take the help of  Bluestacks Player Emulator to generate barcode. Follow the below steps carefully.

I have already posted this trick on one of my blog. But as you all know that there are lots of Bloggers who are keeping their eyes on other tutorials to copy it for their blog in order to make their blog to get notice by new users. But they don't know that Google is smart enough to find the duplicate content by their algorithms. So let it be make them a post by copying it from other blogs. I am not going to make any issue on it over here by raising this point. But at least they should have some dignity by giving the credit to real content writer. However, follow the below steps carefully to generate barcode for Jio sim.

How To Generate Barcode For Jio Sim With Bluestacks Player

How To Generate Barcode For Jio Sim With Bluestacks

1.First off Install Bluestacks Emulator in Your Pc.
2.Now after that Install Xposed Installer.
3.Now installing Xposed installer install IMEI App.
4.After this Change your IMEI with any 4G Device by IMEI App. ( Like Samsung, Lyf, Yureka Etc.)
5.Now after this Install My Jio App  Download My Jio Apk (Use this Version Only).
6.Now Install all the Apps Which is listed on My Jio Apps.
7.After this Turn Off Your Internet Connection and Open My Jio App.
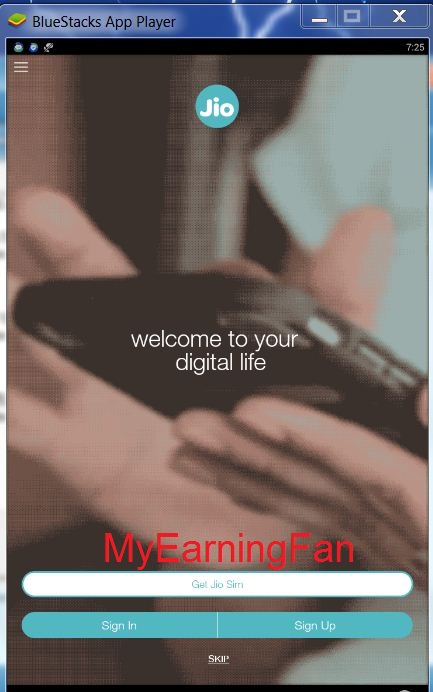
8.You'll see the Option of Get Jio Sim Option there.Now turn on your Internet Option and Click on it.

Jio Sim Barcode MyEarningFan

9.Wait for few seconds you'll see Jio Preview Offer Offer details.

Jio Sim Barcode

10.Click on Agree and Get Jio Offer.
11.On the next page you'll see Eligibility Check. Enter your State and City Details.

Jio Sim Barcode

12.After that Click on Next button and Generate Your Offer Code.

Jio Sim Barcode

Some Important Points To Keep in Mind After Generating Barcode 

After generating Barcode for Jio sim with Bluestacks make sure that you have noticed the IMEI number of your Bluestacks and keep it somewhere. Because you may need this IMEI number later in order to activate your Jio Sim. So it is an Important point to keep it in your mind.

This tutorial is for educational purpose only. So don't try to misuse it for making it illegal by selling barcode to others.

If you don't have Bluestacks then you can use any 3G phone to generate Jio Sim Barcode by using the same method which we have mentioned above. 

Ending Essence !!

So follow the steps carefully to generate Jio sim barcode in order to get Reliance Jio Sim. We are posting trick for educational purpose only. So don't misuse it. If you are unable to generate barcode in your phone then you can take the help of this tutorial by using your IMEI number.

Incoming Searches:-

Saturday, September 10, 2016

How To Use Unlimited Data In Reliance Jio After the Exhaustion of 4GB/Day Limit ( Change Welcome to Preview Offer)

Reliance Jio is a hot and trending topic now days for everyone because of its remarkable step of providing the unlimited usage of data and calling features. If you are searching the topic how to use unlimited data in Reliance Jio After Exhaustion of 4GB per day limit then you are at right place. You can convert back your Welcome offer to Preview offer by using following tricks. As we all know that Reliance has become one of the best choice for youngsters to fulfill their dream of using unlimited data because of  not paying extra bucks to other telecom data plans. But after the announcement of Reliance Inc that they are going to give Welcome offer to all the new users who are having 4G handsets. So in this welcome offer they have introduced that their users can use only 4G data limit per day after that they can use it with 128KBps speed.

How To Use Unlimited Data In Reliance Jio After the Exhaustion of 4GB/Day Limit ( Change Welcome to Preview Offer)

After getting the Welcome offer some of you have been thinking that what we'll do after using 4GB data per day limit ? Can't we use unlimited data beyond this limit of 4GB ? So don't disheartened yourself we are going to tell you that how you can use Unlimited data after the usage of 4GB/day limit without any speed cap. If you have not updated your My Jio app then you can use Preview offer which is giving Unlimited data usage without any 4GB/day limit restrictions. So if you haven't updated your Jio app then you are lucky though that you are not going to face any limit restrictions.

How To Use Unlimited Data In Jio Sim After 4GB Per Day Limit ?

For this if some how you have updated your My Jio app then first you have to downgrade your My Jio app with the provided version of My Jio app. But before doing this first make sure that you have used your 2GB data usage after using your 2GB see whether you have got your Unlimited Data Preview offer or not ? If not then follow the below steps.
1.First of all uninstall your Updated version of My Jio App.
2.After that download this version of My Jio App ( Must use this version)
3.Now after installing this My Jio app turn off your Internet Data connection.
4.Open My Jio App you'll get the option of Get Jio Sim.
5.Now Click on Get Jio Sim option by enabling your Internet Connection ON.
6.You'll get message of "Congratulations ! You have activated your Jio preview offer"

Reliance Jio Unlimited Data Usage

7.Now go on back option and click on Sign up or Sign in you'll be automatically login to your Jio account.
Unlimited reliance Jio data

8.Done !! Now you'll be able to use unlimited data after getting back to the preview offer.

Some Important things to Notice:-

Before using the above trick make sure that you have already used your 2GB data in your Jio sim and after that you didn't see any message of complimentary unlimited access then remove your Jio sim and after that insert it back after two days and see whether you have got that option or not. If not then follow the above trick to make your Reliance Jio sim data unlimited. You can also resolve your speed capping issue by using the above trick.

Glance at Vpn Trick to Increase Downloading Speed in Reliacne Jio Sim

1.First of all Download Snap Vpn or Turbo Vpn or Opera Vpn.
2.As I have downloaded Snap Vpn so i am going to take the example of this vpn you can use other above mentioned Vpn apps.
3.So in Snap Vpn select the Indian Server it may take few seconds to connect. You can choose another server if you like.
4.After that when you get connected to the server resume your downloads or start browsing to get better speed.
5.So you can use this small yet powerful trick to get better speed in your Reliance Jio Sim Internet

Ending Essence !!!

So by using the above method you can get back your preview offer in Reliance Jio sim. After the exhaustion of 4GB per day limit your speed can cap but reverting back to preview offer from welcome offer you'll be able to use unlimited data usage without any capping issue.

Thursday, September 8, 2016

How To Use Reliance Jio 4G Sim In 3G Smartphone - Complete Guide

Wondering about how to use Reliance Jio 4G sim in 3G smartphone ? Yes it could be possible somehow if you could manage to set your Mediatek processor based 3G smartphones to LTE/WCDMA/GSM as network mode. But if you are thinking that you're having a 3G smartphones and how can you make it 4G then you may be right because you can't change the Hardware firmware of your phone. But still there are some tweaks we can do in our Android device to make it usable for Jio 4G sim. In this post we are going to cover almost all the possible way to set LTE mode in your Android device. But before moving ahead to How To part let me tell you that you can be at some risk of damaging your handset by applying these settings. So if you are brave enough to take this mild risk then we can move ahead. Don't blame me if you have messed up with your android device. We are just providing this trick for educational purpose only. If you'd be lucky enough then you can use this trick on any 3G smartphones.

How To Use Reliance Jio 4G Sim In 3G Smartphone - Complete Guide

How To Use Jio Sim In 3G Smartphones

This method is purely based on changing or you can say that spoofing the network mode by enterning the Engineering Mode of your Android Device. And you can easily fetch this Mode by using some apps or some secret code of android. We'll discuss the various methods how to get Engineering Mode and then Network selection in Android Phone to set LTE.

 First of all if you are having any MediaTek Processor Android device then you can try *#*#3646633#*#* code and dial it by opening your Dial pad and check if it works for you. If it doesn't then follow the below steps.
  1. First of download either Mobile Uncle Tool or MTK Engineering Mode.
  2. After downloading any of the above app check the Telephony option and then seek for Network selecting option.
  3. After this select LTE/WCDMA/GSM mode as your preferred network.
  4. Now after this Reboot your phone, Insert the Jio sim and check your 4G network in Jio Sim.
  5. Done !!! Now you'll be able to use Jio sim in your 3G handset.

By using the same process you can use Jio sim on some branded phones like Moto G 3G phones or Coolpad Note 3 Lite. As we all know that Motorola has been one of the greatest phones manufucturer. So by dialing the code *#*#4636*#*# in Moto phones you can do further settings like we have told you about earlier. Now select your preferred network as LTE/WCDMA/GSM.

Now for Coolpad Note 3 Lite. In this phone you can try out the MTK engineering mode app and can select the network by following the above step. After selecting network just set your Jio APN as Jionet if you are getting any problem in connecting due to APN's error.

What is MTK Engineering Mode ?

Engineering mode is nothing just an extra toggle option to enhance the Volume, Vibration or to change your IMEI easily without taking your time. But if you don't know anything about the options in Engineering Mode then don't try to play with it because if you have chosen something wrong options then your phone can behave weird. 

Final Words !!!

So these were the best ways to use your 4G Jio sim in 3G smartphones. But I'd recommend to use LTE phone to enjoy the real speed of 4G on your Jio sim. Do all steps carefully only when you have made your mind to put your 3G smartphones at risk. Rest if you'll be succeed then surely you'll be able to use Jio sim in your 3G handset.

Sunday, September 4, 2016

How To Create Your Own Cloud Torrent Client ( Torrents to IDM )

Cloud Torrent Client is one of the best way to leech your torrent links or files for free without wasting your money on buying any premium account of zbigz or any other account which takes money to leech your torrent files and after creating your own cloud torrent client you don't have to much worry about losing your money.. Torrents have been lovable site when it comes download free softwares, movies, apps etc among the youngsters. As they use the torrents most of the time to download their favorite things. But they always seek better option to leech their torrent magnet links faster to make it download through Internet download manager. If you are also here to seek one of the best and own created cloud torrent client then you read out the whole post on How To Create Your Own Cloud Torrent Client For Free.

In this blog we are trying to post many articles regarding blogging stuffs, HowTo guide and Tech stuffs etc. We have also published about how to leech unlimited torrent files without any premium account on our other blog. As soon we found this one which is easy and reliable and you can create your own cloud torrent client to download your favorite stuffs on your device without fearing of losing anything. So if there isn't anything to worry about then why don't we choose this cloud platform to leech our torrent files.

Personal Torrent Leaching Site

One of the best thing about this one is that this is mobile friendly site and you can download any torrent files on your Android Device. Means just choose the magnet link of your file and paste it in your own cloud client site. And the name of the site is Heroku. We have also created one of our own cloud torrent client. You can use our cloud client to leech your torrent files.

#CREATE YOUR OWN CLOUD TORRENT CLIENT (TORRENTS TO IDM)

If you are thinking that how could it be possible then let me tell you that Heroku is one of the amazing site that give a chance to leech our torrent files to download it via using Internet Download Manager (IDM). There are also some best sites to leech torrent files but they usually need some bucks to let us download it through IDM. People like you and me don't waste our money on these sites :p. That's why we here are going to tell you about this Heroku site and will tell you how to create your own Torrent Client.

If you are getting low speed even though using a paid account to leech your torrent files then you can use your own torrent client to download your files. Usually this torrent client is giving enough speed to leech your torrent files. I am getting much pleasing speed after leeching my files while downloading it through IDM. So let's see how you can create your cloud torrent client.

# HOW TO CREATE YOUR OWN CLOUD TORRENT CLIENT ( TORRENTS TO IDM )

Remember if you are going to use our own cloud torrent client then please don't ever to mess with other leeching files. Means just don't delete other files which they are leeching/caching.

# STEPS TO CREATE YOUR OWN CLOUD TORRENT CLIENT

* First of all go to this link Gihub Heroku Deploy .
* After visiting above site just scroll down and search for Deploy Heroku Button.
* Now after clicking on the Deploy button fill the proper details on the next page and sign up.

Heroku Sign Up


* And you'll get email for confirmation after clicking on confirmation link you'll be redirected to the password fill up page.
* Just create your password using number, symbols or alphabets.
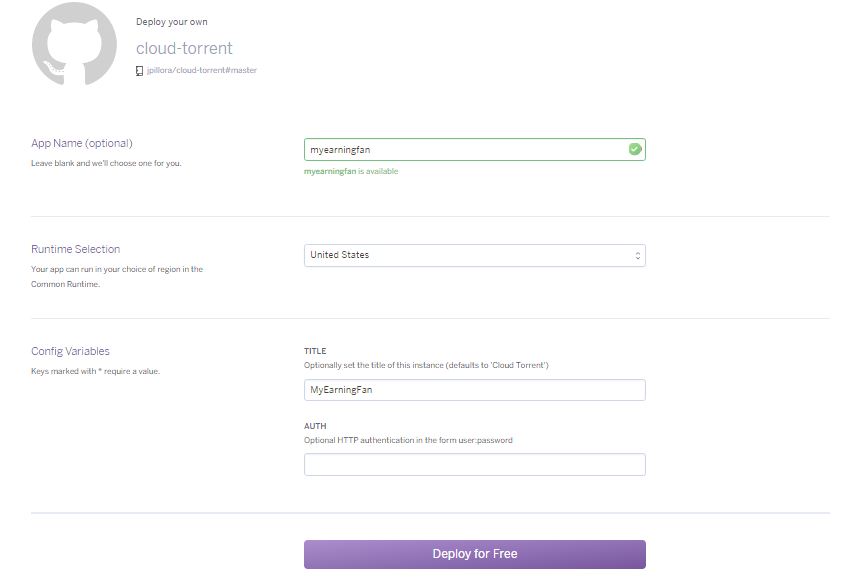
* Now after that on the next page enter application name in lower case letters and select run time as United states only.

Personal Torrent Leeching Account

* Below you'll find the option of Title. Enter your name or Website name. Because it'll be your domain name to access your Cloud Torrent Client.
* Now after that click on Deploy For Free and the site will take time for deploying your cloud torrent client. Wait for few minutes your Cloud torrent client will be ready. 
* After that click on View option to access your Cloud Torrent Client site.
* Done !! Now you have successfully created your own Cloud Torrent Site.
* If you don't want to create for yourself then you can use our Cloud Torrent Client MyEarningFan

# HOW TO DOWNLOAD TORRENT FILES FROM IDM

# First of all you need to visit any torrent sites. Like i am visiting on Kickass.cd.
# Copy the magnet link of torrent files.
# Now after copying the Magnet link just go to your Cloud Torrent client site and paste your magnet link there in the URL box and click on load option.

MyEarningFan Personal Cloud Client

# And wait for few minutes and your magnet link will be cached.
# When the cache process will be completed just click on the file and your file will start downloading choose the downloading option as IDM to download it through IDM.

# OUR CLOUD TORRENT CLIENT SITE       MyEarningFan

Final Words !!!

So this is the best way to leech your torrent files by creating own Cloud Torrent Client. Now using this one you don't need any other platforms to leech your torrent links. If you don't want to create your own cloud torrent client then you can use our Cloud Torrent Client site to leech your favorite movies, games, apps etc.